Polka - Dot Bear
by Adam
( Missouri)

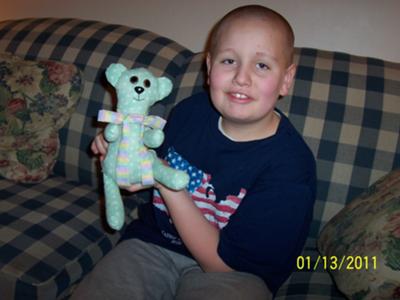
This is me, Adam, and the polka-dot bear I made.
Polka - Dot Bear
Materials Needed: 1/2 yard fabric (may be polka-dotted) thread
4 matching buttons fiberfill
bear eyes/nose or buttons black thread
contrasting fabric or ribbon needle
paper to make pattern pencil
sewing machine pins
This is how you can make a polka-dotted bear. To begin with, you will need the materials above and a pattern.
To make your pattern, you will need a pencil and paper. The parts you need for your bear are two arms, two legs, two ears, and the body and head part. Draw out the parts of your bear on a piece of paper. Then cut out the body parts.
After you are done making the pattern pieces, you can start making your bear.
First, pin the pattern pieces to your fabric. Remember to fold the fabric to double it before pinning on the pattern pieces. This way you cut two of each piece. Cut around each pattern slowly.
Second, you can start sewing. Take off the paper pattern piece. Be sure the right sides of the fabric is together so the bear won't be inside out. Start with the ear pieces and pin around the edges. Now sew around the edges and leave the bottom open. Put a little fiberfill inside the ears.
Next comes the body. Pin the body/head piece together. Put the ears between the head pieces of fabric and pin them in where you will sew. The ears should be looking upside down right now. Sew the edges and leave the bottom open. Turn the bear right side out now. Stuff fiberfill in the bottom and sew up.
Now sew the arms and legs, but leave the top of each one open. Turn the arms and legs right side out. Stuff the arms and legs and sew them shut.
After all of the body parts are made, you are ready to put your bear together. Use a needle and thread to sew the arms and legs to the body. You may sew the buttons to the top of the arms and the legs.
For the face, sew on buttons for eyes and a nose or use sew-on bear's eyes and nose you can buy in a store. Sew on black thread for a mouth.
Put a bow around the bear's neck.
Last of all, give your new bear a bear hug and a nice name.
Related Beginning Projects:
~Beginning Lessons, ~Bandanna Tote Bag with an Inside Lining, ~Sew a Simple Belt, ~Bottle Bag, ~Christmas Stockings, ~Circle Pillow,~ Couch Caddy, ~Dinner Placemat, ~Dress Up Your Jeans, Foam Pencil Case, ~Gathered Apron,~Hair Scrunchy, ~How to Sew Drawstring Bags, ~How to Sew Tote Bags, ~Jean Purse, ~Jean Apron, ~Lap Desk, ~Neck Pillow, ~Patchwork Tote Bag, ~Patchwork Pillow Cover, ~Pillow Cover with Ties, ~Pillow with Trim,~Pocket Purse,~ Sew a Pot Holder, ~Stuffed Animal, ~ Stuffed Ball, ~T-shirt Drawstring Bag, ~Sew a Card, ~No Sew Projects, ~Sewing Safety, ~Felt Patterns~Pillowcase Scarf, ~Felt Tooth Fairy, ~Stuffed Elephant, ~Stuffed Monster,~ Pretty Purse, ~Mini Stuffed Dog, ~Stuffed Bear, ~Baby Receiving Blanket,~ Baby doll blanket & pillow,~Patchwork Skirt, ~Reusable Snack Baggie, ~Glasses Case, ~Sew Tablecloth, ~ Pocket Pillow
Comments for Polka - Dot Bear
|
||
|
||
|
||
Sewing Materials Available


